Manual Partitioning
The Manual Partitioning screen is displayed when you click Done from Installation Destination if you selected the I will configure partitioning option. On this screen you configure your disk partitions and mount points. This defines the file system that CentOS will be installed on.
|
Back up any data that you have on your systems. Unforeseen circumstances can result in loss of all your data. |
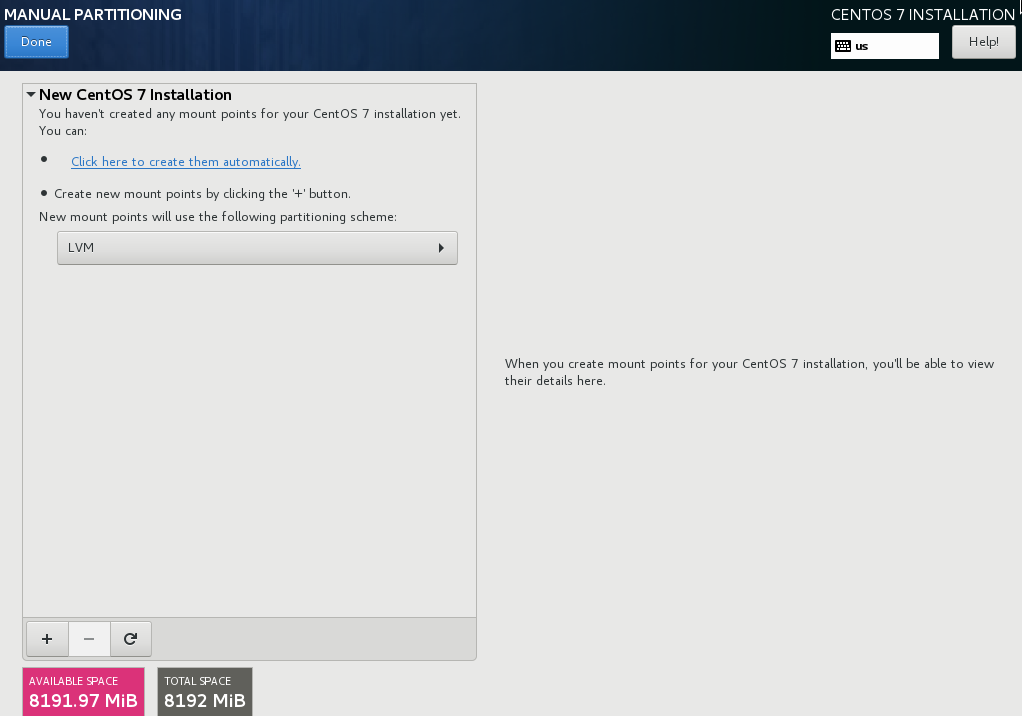
The Manual Partitioning screen initially features a single pane on the left for the mount points. The pane is either empty except for information about creating mount points, or it displays existing mount points that the installation program has detected. These mount points are organized by detected operating system installations. Therefore, some file systems might be displayed multiple times if a partition is shared among several installations. The total space and available space on selected storage devices are displayed beneath this pane.
If your system contains existing file systems, ensure that enough space will be available for the installation. Use the - button to remove unneeded partitions.
|
For recommendations and additional information about disk partitions, see An Introduction to Disk Partitions and Recommended Partitioning Scheme (ppc). At a bare minimum, you need an appropriately sized root partition, and usually a swap partition appropriate to the amount of RAM you have on your system. |
Adding File Systems and Configuring Partitions
An installation of CentOS requires a PReP boot partition and one other partition but CentOS recommends at least five: PReP, /, /home, /boot, and swap. You can also create additional partitions you require. See Recommended Partitioning Scheme (ppc) for further details.
|
If you have any specific requirements for some partitions (for example, requiring that a particular partition be on a specific disk) and less specific requirements for other partitions, create the partitions first which have more specific requirements. |
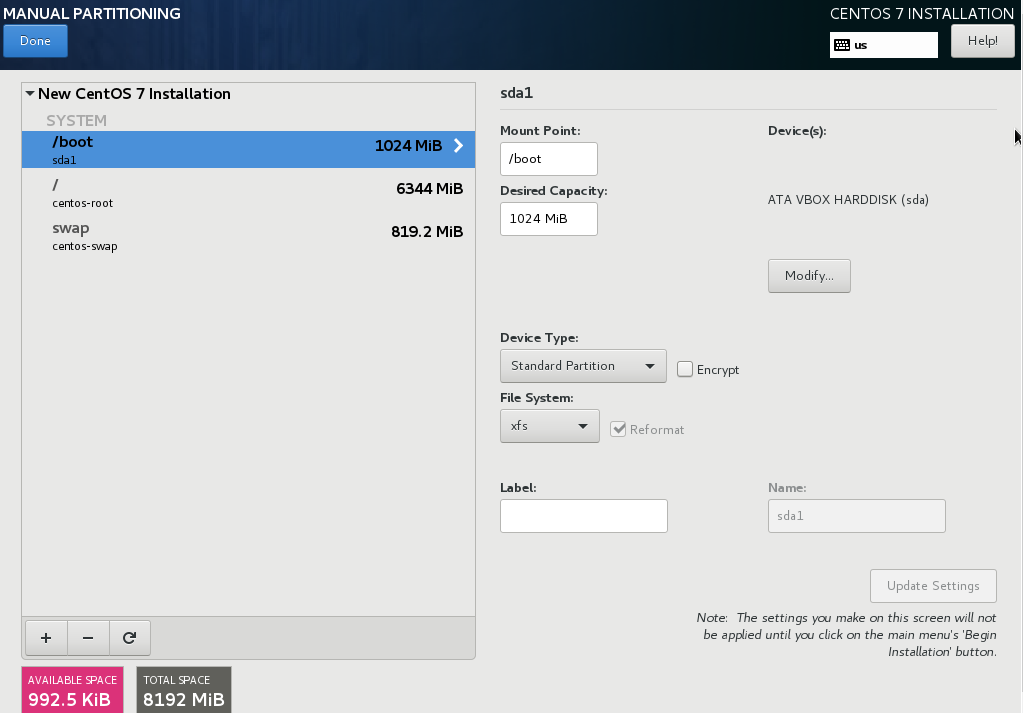
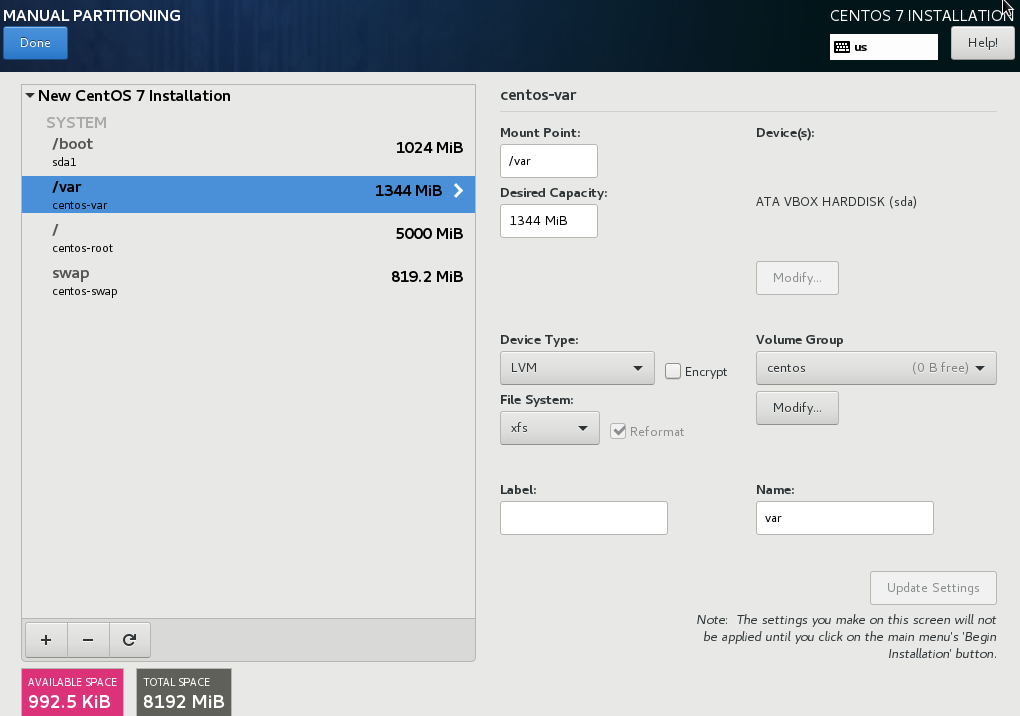
Adding a file system is a two-step process. You first create a mount point in a certain partitioning scheme. The mount point appears in the left pane. Next, you can customize it using the options in the right pane, where you can change the mount point, capacity, the device type, file system type, label, and whether to encrypt or reformat the corresponding partition.
If you have no existing file systems and want the installation program to create the required file systems and their mount points for you, select your preferred partitioning scheme from the drop-down menu in the left pane (default for CentOS is LVM), then click the link on top of the pane for creating mount points automatically. This will generate a /boot partition, a / (root) volume, and a swap volume proportionate to the size of the available storage. These are the recommended file systems for a typical installation, but you can add additional file systems and mount points if you need to.
Alternatively, create individual mount points using the + button at the bottom of the pane. The Add a New Mount Point dialog then opens. Either select one of the preset paths from the Mount Point drop-down menu or type your own; for example, select / for the root partition or /boot for the boot partition. Then enter the size of the file system in the Desired Capacity text field; for example, 2GiB. If you leave the field empty or if you specify a size bigger than available space, all remaining free space is used instead. After entering these details, click the Add mount point button to create the partition.
|
To avoid problems with space allocation, first create small partitions with known fixed sizes, such as Similarly, if you have multiple disks that the system is to reside on, they differ in size, and a particular partition must be created on the first disk detected by BIOS, be sure to start by creating such a partition. |
For each new mount point you create manually, you can set its partitioning scheme from the drop-down menu located in the left pane. The available options are Standard Partition, BTRFS, LVM, and LVM Thin Provisioning. Note that the /boot partition will always be located on a standard partition, regardless of the value selected in this menu.
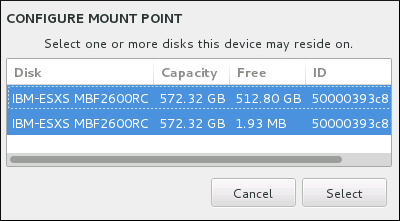
To change on which devices a single non-LVM mount point should be located, select the mount point and click the Modify… button in the right pane to open the Configure Mount Point dialog. Select one or more devices and click Select. After the dialog closes, note that you also need to confirm this setting by clicking the Update Settings button on the right side of the Manual Partitioning screen.
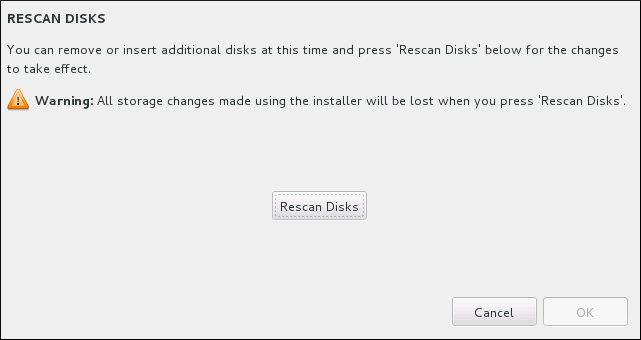
To refresh information about all local disks and partitions on them, click the Rescan button (with the circular arrow icon on it) in the toolbar. You only need to do this action after performing advanced partition configuration outside the installation program. Note that if you click the Rescan Disks button, all configuration changes you previously made in the installation program will be lost.
At the bottom of the screen, a link states how many storage devices have been selected in Installation Destination (see Installation Destination (ppc)). Clicking on this link opens the Selected Disks dialog, where you review the information about the disks. See Boot Loader Installation (ppc) for more information.
To customize a partition or a volume, select its mount point in the left pane and the following customizable features then appear to the right:
-
Mount Point- enter the file system’s mount point. For example, if a file system should be the root file system, enter/; enter/bootfor the/bootfile system, and so on. For a swap file system, the mount point should not be set - setting the file system type toswapis sufficient. -
Desired Capacity- enter the desired size of the file system. You can use common size units such as KiB or GiB. The default is MiB if no other unit is specified. -
Device type- choose one of these types:Standard Partition,LVM,RAID,LVM Thin Provisioning, orBTRFS. Check the adjacentEncryptbox to encrypt the partition or volume. You will be prompted to set a password later.RAIDis only available if two or more disks are selected for partitioning, and if you choose this type, you can also set theRAID Level. Similarly, if you selectLVM, you can specify theVolume Group. -
File system- in the drop-down menu, select the appropriate file system type for this partition or volume. Check the adjacentReformatbox to format an existing partition, or leave it unchecked to retain your data. Note that newly created partitions and volumes must be reformatted, and the check box cannot be unchecked in this case. -
Label- assign a label to the partition. Labels are used for you to easily recognize and address individual partitions. -
Name- assign a name to an LVM or Btrfs volume. Note that standard partitions are named automatically when they are created and their name cannot be edited, such as/homebeing assigned the namesda1.
See File System Types (ppc) for more information about file system and device types.
Click the Update Settings button to save your changes and select another partition to customize. Note that the changes will not be applied until you actually start the installation from the Installation summary page. Click the Reset All button to discard all changes to all partitions and start over.
When all file systems and mount points have been created and customized, click the Done button. If you chose to encrypt any file system, you will now be prompted to create a passphrase. Then, a dialog appears, showing a summary of all actions related to storage that the installation program will take. This includes creating, resizing, or deleting partitions and file systems. You can review all the changes and click Cancel & Return to Custom Partitioning to go back. To confirm your changes, click Accept Changes to return to the Installation Summary page. To partition additional devices, select them in the Installation Destination screen, return to the Manual Partitioning screen, repeat the steps outlined in this section for the additional devices.
|
If This limitation only applies to |
File System Types
CentOS allows you to create different device types and file systems. The following is a brief description of the different device types and file systems available, and how they can be used.
-
standard partition- A standard partition can contain a file system or swap space, or it can provide a container for software RAID or an LVM physical volume. -
logical volume (LVM)- Creating an LVM partition automatically generates an LVM logical volume. LVM can improve performance when using physical disks. For information on how to create a logical volume, see Create LVM Logical Volume (ppc). For more information regarding LVM, see the Red Hat Enterprise Linux 7 Logical Volume Manager Administration guide. -
LVM thin provisioning- Using thin provisioning, you can manage a storage pool of free space, known as a thin pool, which can be allocated to an arbitrary number of devices when needed by applications. The thin pool can be expanded dynamically when needed for cost-effective allocation of storage space. For more information regarding LVM, see the Red Hat Enterprise Linux 7 Logical Volume Manager Administration guide.The installer will automatically reserve 20% of any requested space for an LVM thin pool logical volume in the volume group containing it. This is a safety measure to ensure that you can extend either the metadata volume or the data volume of your thinly provisioned logical volume.
-
xfs- XFS is a highly scalable, high-performance file system that supports file systems up to 16 EiB (approximately 16 billion GiB), files up to 8 EiB (approximately 8 billion GiB), and directory structures containing tens of millions of entries. XFS supports metadata journaling, which facilitates quicker crash recovery. The XFS file system can also be defragmented and resized while mounted and active. This file system is selected by default and is highly recommended. For information on how to translate common commands from previously used ext4 file system to XFS, see Reference Table for ext4 and XFS Commands.The maximum supported size of an XFS file system in CentOS is currently 500 TiB.
-
ext4- The ext4 file system is based on the ext3 file system and features a number of improvements. These include support for larger file systems and larger files, faster and more efficient allocation of disk space, no limit on the number of subdirectories within a directory, faster file system checking, and more robust journaling.The maximum supported size of an ext4 file system in CentOS is currently 50 TiB.
-
ext3- The ext3 file system is based on the ext2 file system and has one main advantage - journaling. Using a journaling file system reduces time spent recovering a file system after a crash as there is no need to check the file system for metadata consistency by running thefsckutility every time a crash occurs. -
ext2- An ext2 file system supports standard Unix file types, including regular files, directories, or symbolic links. It provides the ability to assign long file names, up to 255 characters. -
vfat- The VFAT file system is a Linux file system that is compatible with Microsoft Windows long file names on the FAT file system. -
swap- Swap partitions are used to support virtual memory. In other words, data is written to a swap partition when there is not enough RAM to store the data your system is processing. -
PReP- this small boot partition is located on the first partition of the hard drive. The PReP boot partition contains the GRUB2 boot loader, which allows other IBM Power Systems servers to boot CentOS.
Each file system has different size limits for the file system itself as well as individual files contained within. For a list of maximum supported file and file system sizes, see the Red Hat Enterprise Linux technology capabilities and limits page, available on the Customer Portal at https://access.redhat.com/site/articles/rhel-limits.
Create LVM Logical Volume
Logical Volume Management (LVM) presents a simple logical view of underlying physical storage space, such as hard drives or LUNs. Partitions on physical storage are represented as physical volumes that can be grouped together into volume groups. Each volume group can be divided into multiple logical volumes, each of which is analogous to a standard disk partition. Therefore, LVM logical volumes function as partitions that can span multiple physical disks.
To learn more about LVM, see Understanding LVM or read the Red Hat Enterprise Linux 7 Logical Volume Manager Administration guide. Note that LVM configuration is only available in the graphical installation program.
|
During text-mode installation, LVM configuration is not available. If you need to create an LVM configuration from scratch, press Ctrl+Alt+F2 to use a different virtual console, and run the |
To create a logical volume and add it to a new or existing volume group:
-
Create a mount point for the LVM volume as described in Adding File Systems and Configuring Partitions (ppc).
-
Click the
Device Typedrop-down menu and selectLVM. TheVolume Groupdrop-down menu appears and displays the newly-created volume group name. -
Optionally, either click the menu and select
Create a new volume groupor click Modify to configure the newly-created volume group, if you need to. Both theCreate a new volume groupoption and the Modify button lead to theConfigure Volume Groupdialog, where you can rename the logical volume group and select which disks will be included.The configuration dialog does not allow you to specify the size of the volume group’s physical extents. The size will always be set to the default value of 4 MiB. If you want to create a volume group with different physical extents, create it manually by switching to an interactive shell and using the
vgcreatecommand, or use a Kickstart file with thevolgroup --pesize=sizecommand.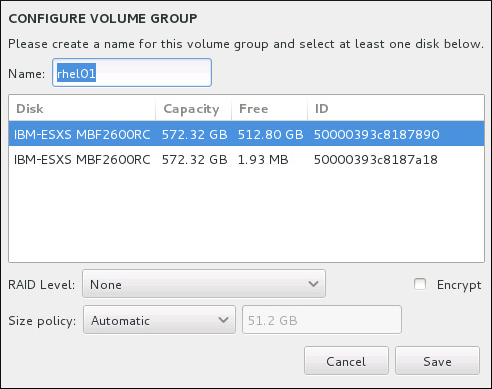 Figure 6. Customizing an LVM Volume Group
The available RAID levels are the same as with actual RAID devices. You can also mark the volume group for encryption and set the size policy for it. The available policy options are:
-
Automatic- the size of the volume group is set automatically so that it is just large enough to contain the configured logical volumes. This is optimal if you do not need free space within the volume group. -
As large as possible- the volume group is created with maximum size, regardless of the size of the configured logical volumes it contains. This is optimal if you plan to keep most of your data on LVM and later need to increase the size of some existing logical volumes, or if you need to create additional logical volumes within this group. -
Fixed- with this option, you can set an exact size of the volume group. Any configured logical volumes must then fit within this fixed size. This is useful if you know exactly how large you would like the volume group to be.Click Save when the group is configured.
-
-
Click Update Settings to save your changes, and either continue with another partition or click Done to return to the
Installation Summaryscreen.
|
Placing the |
Recommended Partitioning Scheme
Unless you have a reason for doing otherwise, CentOS recommends that you create the following partitions:
- A PReP boot partition - recommended size of 4 to 8 MiB
-
The first partition of the hard drive should include a PReP boot partition. This contains the GRUB2 boot loader, which allows other IBM Power Systems servers to boot CentOS.
/bootpartition - recommended size at least 1 GiB-
The partition mounted on
/bootcontains the operating system kernel, which allows your system to boot CentOS, along with files used during the bootstrap process. Due to the limitations of most firmwares, creating a small partition to hold these is recommended. In most scenarios, a 1 GiB boot partition is adequate. Unlike other mount points, using an LVM volume for/bootis not possible -/bootmust be located on a separate disk partition.If you have a RAID card, be aware that some BIOS types do not support booting from the RAID card. In such a case, the
/bootpartition must be created on a partition outside of the RAID array, such as on a separate hard drive.If you have a RAID card, be aware that CentOS does not support setting up hardware RAID on an IPR card. You can boot the standalone diagnostics CD prior to installation to create a RAID array and then install to that RAID array.
root- recommended size of 10 GiB-
This is where "
/", or the root directory, is located. The root directory is the top-level of the directory structure. By default, all files are written to this file system unless a different file system is mounted in the path being written to (for example,/bootor/home).While a 5 GiB root file system allows you to install a minimal installation, it is recommended to allocate at least 10 GiB so that you can install as many package groups as you want.
Do not confuse the
/directory with the/rootdirectory. The/rootdirectory is the home directory of the root user. The/rootdirectory is sometimes referred to as slash root to distinguish it from the root directory. /home- recommended size at least 1 GiB-
To store user data separately from system data, create a dedicated file system for the
/homedirectory. This file system should be sized based on the amount of data that will be stored locally, number of users, and so on. This will enable you to reinstall CentOS without erasing user data files. If you select automatic partitioning, it is recommended to have at least 55GiB of disk space available for the installation, to ensure that the/homefile system is created. swappartition - recommended size at least 1 GB-
Swap file systems support virtual memory; data is written to a swap file system when there is not enough RAM to store the data your system is processing. Swap size is a function of system memory workload, not total system memory and therefore is not equal to the total system memory size. Therefore, it is important to analyze what applications a system will be running and the load those applications will serve in order to determine the system memory workload. Application providers and developers should be able to provide some guidance.
When the system runs out of swap space, the kernel terminates processes as the system RAM memory is exhausted. Configuring too much swap space results in storage devices being allocated but idle and is a poor use of resources. Too much swap space can also hide memory leaks. The maximum size for a swap partition and other additional information can be found in the
mkswap(8)manual page.The following table provides the recommended size of a swap partition depending on the amount of RAM in your system. If you let the installation program partition your system automatically, the swap partition size will be established using these guidelines. Automatic partitioning setup assumes that the maximum size of the swap partition is limited to 10% of the total size of the hard drive, and the installer cannot create swap partitions more than 128GB in size. If you want to set the swap partition size to more than 10% of the system’s storage space, or more than 128GB, you must edit the partitioning layout manually.
Table 1. Recommended System Swap Space Amount of RAM in the system Recommended swap space Recommended swap space if allowing for hibernation less than 2 GB
2 times the amount of RAM
3 times the amount of RAM
2 GB - 8 GB
Equal to the amount of RAM
2 times the amount of RAM
8 GB - 64 GB
4GB to 0.5 times the amount of RAM
1.5 times the amount of RAM
more than 64 GB
workload dependent (at least 4GB)
hibernation not recommended
At the border between each range listed above (for example, a system with 2 GB, 8 GB, or 64 GB of system RAM), discretion can be exercised with regard to chosen swap space. If your system resources allow for it, increasing the swap space can lead to better performance.
Distributing swap space over multiple storage devices - particularly on systems with fast drives, controllers and interfaces - also improves swap space performance.
|
The PackageKit update software downloads updated packages to |